Monday, December 19, 2011

Department Store Knockoff Beanie

This beanie is designed to look like a knitted beanie that my husband and I saw at Macy's -- only the one at Macy's was a bit small for his head.
What was nice about this beanie was that the lower part of it was about 2.5 inches of 3x3 ribbing before changing to 2x2 ribbing, which gave the hat a lot more visual interest than it would otherwise have had. I tried my best to duplicate the style while enlarging it, making it large enough to cover any head (while the ribbing makes it small enough even for me to wear).

I used Dream in Color/Smooshy, though I could see using any fingering-weight yarn.
I used a circular size US1 needle. (I used the same circular needle the whole time, but feel free to switch to DPNs if you prefer, especially toward the end.)
Because I was mostly concerned about width (rather than height) of my stitches:
  • 21 stitches = 3.75 inches unblocked/unstretched.
  • On the finished hat, 40 stitches in k2p2 ribbing were 4 inches.
  • The height of the k3p3 section is about 2.75 inches at 27 rows. 
Given the nature of this design, exact gauge is not terribly important, it just needs to be fairly close. What was more important to me was to get a nice fabric -- dense without being too tight, so it was still flexible but not see-through. 

Some notes on math and size
If you need to make size adjustments: It was important at cast-on for the hat to be an even-multiple of 3, that is, I used the formula 56x3 = 168. (Even-number multiplied by 3 so that the ribbing would work properly the whole way around.) It also needs to be an even multiple of 2 (168 = 84x2). This means your total number of stitches needs to be a multiple of both 2 and 3. So, if you wanted to size it down, you could go down to 156 stitches (52x3 and 78x2) but NOT 162 (which is 54x3 but is 81x2 because 81 is an odd number). 

Pattern!

Cast on 168 stitches. I used the long-tail method because I prefer it and it does have some give to it, which was ideal for a hat. 
Place a marker before joining; we're going to work in the round.

Rows 1-27: Work K3, P3 ribbing around.

Rows 28-62: Work K2, P2 ribbing around (35 rows).

Row 63: [K2, P2, K2, P2tog] around.

Rows 64-67: [K2, P2, K2, P1] around (4 rows).

Row 68: [K2, P2tog, K2, P1] around.

Rows 69-72: K2, P1 around (4 rows).

Row 73: K2, P2tog around.

Rows 74-77: K2, P2 around (4 rows).

Row 78: K2, P2, K2, P2tog around -- there will be only 4 stitches at the end of the round as K2, P2, this is fine.

Rows 79-82: K2, P2, K2, P1 around (again, the last set will be K2, P2) (4 rows).

Row 83: K2, P2tog, K2, P1 around -- here you will end with K2, P2tog.

Rows 84-87: K2, P1 around (4 rows).

Row 88: K2, P2tog around to last stitch, then M1 purlwise to complete the round. (This is to ensure the correct number of stitches needed for the next rounds.)

Row 89: K2, P2 around.

Row 90: K2, P2tog around.

Row 91: K2tog, P1 around.

Cut yarn, feed it through the remaining live stitches and pull tightly/secure thread/weave in ends. Voila, you're done!

Sunday, April 3, 2011

Flowers after the frost, part II

Sunday, April 3:
I'm working on this project again, this time in KnitPicks' CotLin yarn, DK weight. This yarn, being a cotton-linen blend, is good for my friend in Florida (for whom I'm making the piece) but offers some interesting differences. The wool yarn blocked out solidly but still had stretch after it was dry.
On the other hand, the CotLin (a blend of cotton and linen) is a bit firmer, less what I'd call "sproingy". Where my arm measures about 16 inches around, my friend's arm is more like 11 inches, though she did caution me that she'd prefer room since she can fluctuate. That's fine!
The stitch definition I'm getting with this yarn without blocking it is beautiful (I've used it before but for cabling, not for fine lace work). I suspect this one will be roughly the same number of repeats/size since it is less forgivingly stretchy than the wool but I'll be updating this as it goes.
Going along fairly smoothly; I found a typo in my pattern (typo = missed transcription of a K2 when I was typing it up), which is good that I caught before anybody else tried to do it and came up 4 stitches short on that row and had much hair-pulling when they tried to figure out the problem. However, that one hiccup overcome, it's been moving along though it'll be slower during the work week. If I'm lucky, I'll finish in a couple days. I'm noticing it seems a little more open than it did with the wool yarn, despite their being theoretically both DK weight, but I think that'll be ok for Florida so no problem there.

Tuesday:
It's been a busy couple of days, but I'll finish the lace portion of the body tomorrow. I wonder if I can finish the lace, do the arms, and collar all in one evening. Not that there's a particular rush, but I'd like to see it done and off to the intended recipient. So far nothing new to report regarding the yarn, and I won't be doing a contrast color for the collar it'll just be the same blue. Also: cotton, so no need to pre-block the lace (else I'd do it tonight -- who am I kidding!).
The main thing is that I'm deciding whether to end after 6 pattern repeats (that is, 3 of the first four rows, 3 of the last four rows) or if I should add in one more for good measure. I don't want it to end up too saggy too fast! But I also don't want it to arrive and be uncomfortably tight.

Wednesday:
Measurements. I've decided to go with a grand total of 72 pattern rows and I've finished off the all-knit row but, as noted, I've left my stitches live on the bottom and I'll be slipping them to a holder while I work the arms.
Since I've got more wiggle room in this one, I'm going to make the arms circular to begin with, which will save me seaming them later but may cause other, unforeseen problems. In the meantime, I took measurements of the piece, unstretched (first) and stretched in each direction.


11 inches tall and 15 inches wide.


14 inches tall and 17 inches wide.


Thursday:
I've finished the shrug, the numbers for the collar/ribbing are all exactly the same and it came awfully close to using a whole two skeins of the CotLin (good thing I had them both!)
But on the plus side, it looks lovely!
I'm really pleased with it and I hope the intended recipient likes it as well.

Thursday, March 31, 2011

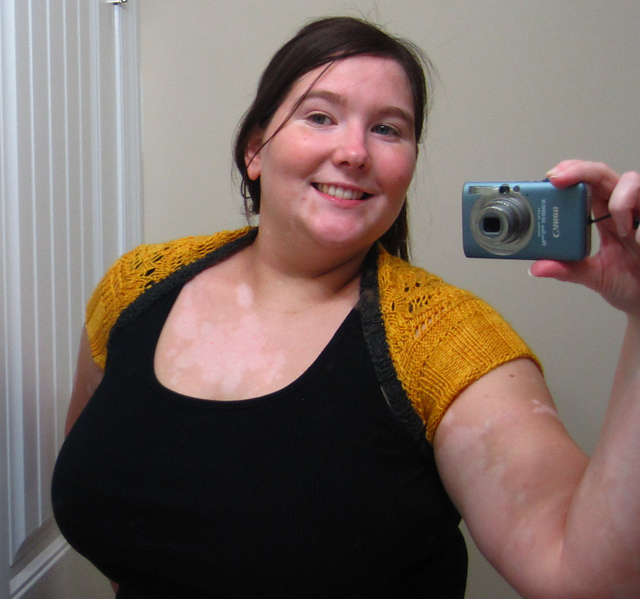
Spring! Shrug

So, it's spring, and I got some yarn in a beautiful, springtimey color but ... I only got about 235 yards. (You're thinking, What?! I know. But it was available.)

So, The Unique Sheep, superwool DK in Gold Ochre is what I used for the body and I accented it with a charcoal grey yarn that I had left over from making my brother's Christmas present: Caron Country, which is listed as a worsted weight yarn but actually works more like a DK. I love yellow and grey together and I thought that they were both in the same tone/feel to the color, and it worked for me.

I knitted the whole thing on size 5 (US) needles. I didn't swatch, per se, but measuring the final piece I've got 3 inches for 12 stitches and 2.5 inches for 8 rows(bound off) of k3/p3 ribbing, blocked.

I wanted to do something with it that was not a scarf, I wanted something spring but also wearable. And for me, springtime is all about flowers. I thought about it and decided there was no better pattern (for me) than the frost flowers pattern.

Approximately 33 inches around armpit-to-armpit (unstretched), although it stretches a great deal.
About 21 inches from sleeve to sleeve (the whole width of the garment). But again, it stretches a great deal.
Stretched the numbers are closer to 48 inches and 29 inches, respectively.
Armholes are about 12 inches around, unstretched, but stretch to about 16 around.
Stretch is important here because I'm stretching the garment about to its limit when I wear it, but if I'd had more yarn I'd have made it slightly larger!

Pictures:


I call it Flowers after the Frost. And my pattern is more a recipe of how to make it than anything else. I don't think there's going to be a ton of variability possible in the size because the pattern itself is only two repeats wide (you'd have to be VERY skinny to rid yourself of the second repeat!) though the fit can certainly be adjusted for those who might, say, have a bit more yarn. :)

The overall design went like this:
Main portion (lace) followed by arm-ribbing. Block, then sew armholes, then pick up stitches around for grey section.

Lace portion:
The lace is in two 4-row sections, each of which is repeated three times before switching to the next section. This means that you do
Row 1, Row 2, Row 3, Row 4, Row 1, 2, 3, 4, 1, 2, 3, 4,
then
Row 5, Row 6, Row 7, Row 8, Row 5, 6, 7, 8, 5, 6, 7, 8
until completion.

Cast on 78 stitches in your preferred method (I used long-tail).
Setup row: K4, pm, K70, pm, K4. There will be four stitches of garter edging on either side. (I liked to have a base row on either side that wasn't immediately lace, so there is a matching all-knit row at the end.)
Updated: I missed a very important K2 in row 7. 

Rows are:
  1. K4, sl m, K4, *K2tog, K4, yo, P2, [K2, yo, sl1, K1, psso] 3x, P2, yo, K4, sl1, K1, psso**, K6, repeat from * to **, K4, sl m, K4
  2. K4, sl m, P3, *P2tog tbl, P4, yo, P1, K2, [P2, yo, P2tog] 3x, K2, P1, yo, P4, P2tog**, P4, repeat from * to **, P3, sl m, K4
  3. K4, sl m, K2, *K2tog, K4, yo, K2, P2, [K2, yo, sl1, K1, psso] 3x, P2, K2, yo, K4, sl1, K1, psso, K2**, repeat from * to **, sl m, K4
  4. K4, sl m, P1, *P2tog tbl, P4, yo, P3, K2, [P2, yo, P2tog] 3x, K2, P3, yo, P4, P2tog**, repeat from * to **, P1, sl m, K 4
    Remember that these four rows are repeated in sequence three times before moving on to the next row.
  5. K4, sl m, K 1, *yo, sl1, K1, psso, K2, yo, sl1, K1, psso, P2, yo, K4, sl1, K1, psso, K6, K2tog, K4, yo, P2, K2, yo, sl1, K1, psso**, K2, repeat from * to **, K3, sl m, K4
  6. K4, sl m, P1, *yo, P2tog, P2, yo, P2tog, K2, P1, yo, P4, P2tog, P4, P2tog tbl, P4, yo, P1, K2, P2, yo, P2tog**, P2, repeat * to **, P3, sl m, K4
  7. K4, sl m, K1, *yo, sl1, K1, psso, K2, yo, sl 1, K1, psso, P2, K2, yo, K4, sl1, K1, psso, K2, K2tog, K4, yo, K2, P2, K2, yo, sl1, K1, psso**, K2, repeat from * to **, K3, sl m, K4
  8. K4, sl m, P1, *yo, P2tog, P2, yo, P2tog, K2, P3, yo, P4, P2tog, P2tog tbl, P4, yo, P3, K2, P2, yo, P2tog**, P2, repeat from * to **, P3, sl m, K4
    Remember that these four rows are repeated in sequence three times before moving back to the first row.
Repeat these rows in sets of 12-rows-at-a-time until your piece is long enough to wrap around your arm.
I did 108 rows total; that is, the first 12-row section was done 5 times and the second 12-row section was done 4 times.

Knit across 1 row (as described above). 
I left my stitches live and did not bind off, just moved my live stitches onto spare wires!

Sleeves:
[Nota Bene: I worked these flat and then seamed them because I wasn't certain if this would be slightly-too-tight on my arms, again, I was making it as small as would possibly fit. Feel free to knit this in the round if you prefer, though then you'll want an exact multiple of 3 stitches picked up. You'll also want to block the lace portion first.]

Along both the left and right garter edges I picked up 56 stitches (half of the number of rows knit in pattern, for those making a different number of rows).

On the right side and left side I did reversed patterns so that they would match when facing. That is:
Side 1: P4, [K3, P3] to 4 stitches from end, K4
Side 2: K4, [P3, K3] to 4 stitches from end, P4
Your numbers will vary if you pick up a different number of stitches.

I repeated each side for 21 rows, then bound off.

Construction:
At this point, I blocked what I had.
Once it was dried, I sewed up the ribbed portion of the sleeves. This is where the customization comes in:
In my case, I was able to sew it up right up to the end of the ribbing, though for skinnier folks, you may want to sew in further and for those who are wider, you'll want to sew less.


Collar:
Because I had 78 stitches across the bottom (still live) I picked up 3 stitches at each armpit (where the sleeves are) and then the other 78 cast on stitches across the top. This makes a perfect multiple of 3 for K3/P3 ribbing.
I repeated this for 7 rows and then bound off with Jeny's surprisingly stretchy bind off. (I highly recommend Cat Bordhi's video for those who learn like me, since she demonstrates binding off in ribbing!)

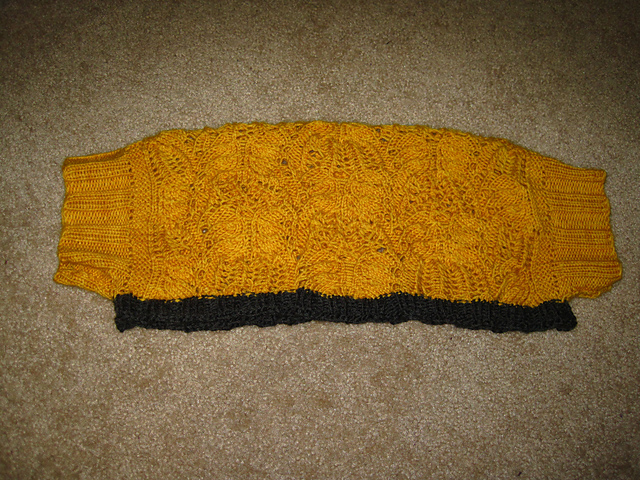
In the end, it looks like this when flat:

I'm now working on a version of this in a cotton yarn, so any thoughts/comments I have on that are going in my blog's next post.

Thursday, July 1, 2010

Cthulhu for your iPhone

Cthulhu Phone Cozy
This was the inspiration for my next crochet project. (In the midst of a move, I need something small, portable, and really not that complicated.)

NOTA BENE: These comments are from the recipient regarding the fit (seeing as I don't personally have the iPhone to test it on).

It's a tight fit, height-wise. definitely usable, but you may want to add another row or two of height to the pocket.


I chained 26 13, then worked a single loop only around in a circle (that is, 25blo, 25flo 14blo, 14flo), on the next row I chained one at either end of the circle, making 28 around. For me, that's about 2.75 inches across the interior of the pocket. I'm going in circles with a stitch marker to hold my place, but I've only gone about 3 inches so far. Not quite sure what I'm going to do when I get to the head.
This shape looks to me as though it'll be perfect for something as thin and flat as the iPhone, although I don't have one myself to test it on. I imagine this 'recipe' can easily be adjusted for phones with slightly different dimensions, but should fit all models of iPhone if I get it right.

EDIT 7/2:

At 20 circular rows (4 inches) I then marked off a stitch at either end, and worked 13 across one side only.

I'm continuing this one-side-only as a flap to go over the top of the phone, approximately 1 inch (for a total of 4.5 inches space for the phone).

The plan is for using buttons for eyes. Fancy eyes, like those in the original, have the possible downside of scratching the phone, so I want to avoid that, obviously! Googly eyes would look silly, so I think black button eyes are going to be the way to go.


EDIT 7/8:
It's completed.


To work coils: do not bind off yarn from flap, but work back loop only (that is, the side that, when flipped over, will be the front of the cozy).
Chain 5, turn and make two sc in each of the 4 spots, this creates a coiling shape. Slip stitch into the next two stitches at the base, and start again. Repeat the coils until you've worked your way across the front, then bind off.

The reason we worked back loop only is to free up the other side of the stitches. In the middle of the "front" side, join new yarn with a slip, chain 3 (or as many/few as needed to fit around the button--my mouth button was larger than my eye buttons), and slip onto second stitch (that is, skip a front loop stitch) and bind off. Buttonhole, completed.

Sew button for "mouth" to the top/middle of the front, so that the buttonhole matches up.

To work eyes: Slip onto stitch near front/top of the flap enclosure (you don't want to acidentally put the eyes on the back of his head, but they need to have a bit of space above the mouthtenacles). The eye-shapes are triple crochet fans (5 triple stitches into one picked up crochet). Bind off and sew on ends.

You may notice that I didn't sew the eye buttons directly onto the fans, but almost directly on top of the stitch I picked up. This makes the eye fans look like ridges (in my opinion).

Next time, I might make the flap enclosure a little longer, it would give me a bit more wiggle room for the eye features.

Monday, June 7, 2010

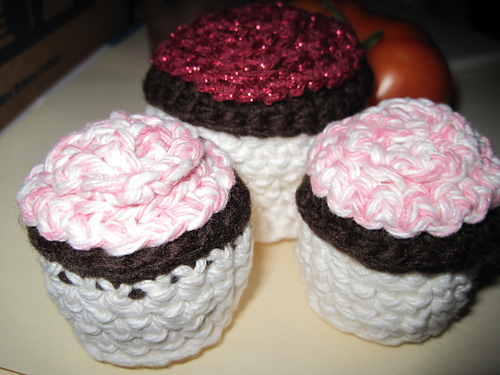
Cupcakes

I've done a bit of playing around with yarn and found a "recipe" I like for cupcakes.


The mini cupcakes are quite small:
and their pattern is in 3 parts:
Because they're so small, you'll only use a small amount of yarn for each. I can't even guess at the amounts! I used an F hook but crochet a bit loosely.
The frosting and "cup" are in worsted weight/kitchen cotton, the brown is in a bulky weight, but shouldn't matter.

Frosting:
Ch 35, sc all, bind off, but leave a long tail for sewing later.
(Update: I realized, I forgot to explain that the frosting is sewn as a coil onto the top of the cupcake. The coils should barely overlap and the frosting will come up a bit off the top of the cupcake. I start on the outside and coil inward.)

Cupcake:
This is a solid item:
--Magic loop. Sc 5 stitches.
Increase by 5 each row:
--2 sc in each stitch around (10)
--sc, 2 sc in next stitch -- 5x (15)
--sc, sc, 2 sc in next stitch -- 5x (20)
Bind off.

'Paper'/Wrapper:
In order to make the cupcake have an edge that sticks out over the "paper", sc into the inside loop only on the bottom of the cupcake top.
--sc around all (20)
-- decrease by 2 (crochet 2 tog, twice, I did this at stitches 1 and 10) -- (18)
-- sc all around (18)
-- sl st all around (on the interior, to create the round for the bottom) -- (18)
-- sc all around interior (18)
-- dec (crochet 2 tog) around -- (9)
fill
-- dec around and sew shut. (continue decreasing as necessary to get a small enough opening to sew shut if this is not small enough.)


Larger cupcakes -- they are more or less the same, just on a larger scale! On the other hand, the red yarn I used for the frosting is an unknown stash yarn, I'd guess it to be DK weight.

Frosting:
Ch 60, sc all, bind off, but leave a long tail for sewing later.
The frosting is sewn as a coil onto the top of the cupcake. The coils should barely overlap and the frosting will come up a bit off the top of the cupcake. I start on the outside and coil inward.

Cupcake:
This is a solid item:
--Magic loop. Sc 5 stitches.
Increase by 5 each row:
--2 sc in each stitch around (10)
--sc, 2 sc in next stitch -- 5x (15)
--sc, sc, 2 sc in next stitch -- 5x (20)
--sc, sc, sc, 2 sc in next stitch -- 5x (25)
--sc, sc, sc, sc, 2 sc in next stitch -- 5x (30)
Bind off.

'Paper'/Wrapper:
In order to make the cupcake have an edge that sticks out over the "paper", sc into the inside loop only on the bottom of the cupcake top.
--sc around all (30)
-- decrease by 2 (crochet 2 tog, twice, I did this at stitches 1 and 15) -- (28)
-- sc all around (28)
-- decrease by 2 (crochet 2 tog, twice, I did this at stitches 1 and 14) -- (26)
-- sc all around (26)
-- decrease by 2 (crochet 2 tog, twice, I did this at stitches 1 and 13) -- (24)
-- sl st all around (on the interior, to create the round for the bottom) -- (24)
-- sc all around interior (24)
-- sc, crochet 2 tog around -- (16)
-- dec by half (crochet 2 tog, around) -- (8)
fill

-- dec around and sew shut. (continue decreasing as necessary to get a small enough opening to sew shut if this is not small enough.)


Thursday, April 1, 2010

Happy Easter

The Easter season is upon us, and I've been working on creating an amigurumi bunny to go with the basket I crocheted.


Pattern below, along with plenty of process photos.

And now, for the ears! (n.b. the nose is with the same yarn that I used for the basket, as are the ear bits.)


Need:
Yarn (I used sport weight I Love This Yarn! from Hobby Lobby)
Contrast yarn (for nose/ears; I used Crystal Palace Yarns Party in "spring picnic")
Safety eyes
Stitch marker(s) as preferred
Tapestry needle
Crochet hook - F/3.75mm -- I crochet very loosely. Feel free to adjust as necessary


Head/Body:
Magic loop: 4 stitches (or other preferred method). (4)
2: Increase every stitch (make 2 sc in each sc space) (8)
3: Make [1 sc, inc in next stitch] 4x (12)
4: Make [2 sc, inc in next stitch] 4x (16) 
5: [3 sc, inc in next stitch] 4x (20)
6: [4 sc, inc] 4x (24)
7: [5 sc, inc] 4x (28)
8: [6 sc, inc] 4x (32)
9-13: sc every stitch (32-5x)
14: 20 sc, then work cheeks on remaining 12 stitches: 2sc, inc 2x, 4sc, inc 2x, 2sc (36)
15-17: 20 sc, then: dec, sc, inc 2x, sc, dec 2x, sc, inc 2x, sc, dec (36-3x)
18: [6 sc, dec] 4x (32)
19: [2 sc, dec] 8x (24)
20: [3sc, dec] 4x (20)
21: sc around (20) (I stuffed the head, added eyes, and sewed the nose on here)
22: [4 sc, inc] 4x (24)
23: [5sc, inc] 4x (28)
24: [6sc, inc] 4x (32)
25-26: sc around (32-2x)
27: [7sc, inc] 4x (36)
28-30: sc around (36-3x)
31: [8 sc, inc] 4x (40)
32-33: sc around (40-2x)
34: [9 sc, inc] 4x (44)
35-38: sc around (44-4x)
39: [9 sc, dec] 4x (40)
40: [3 sc, dec] 8x (32)
41: [2 sc, dec] 8x (24)
42: [4 sc, dec] 4x (20) (I stuffed more here.)
43: [2sc, dec] 5x (15)
44: [sc, dec] 5x (10)
45: dec all (5)
46: dec, decrease 3 to 1 (2) and bind off.

Ears (make 2):
Chain 7, slip stitch closed.
2-12: sc around (7-11x)
13: sc, dec, sc, dec, sc (5)
14: sc around (5)
15: sc, dec 2x (3)
16: sc around (3) and bind off. (Add stitches for interior of ear. I did this by picking a spot near the top and threading the contrast color through, then doing this twice more through the same top loop but different bottom loops.)

Feet (make 2):
Magic loop 5 stitches.
2: inc all (10)
3: [sc, inc] 5x (15)
4: [2 sc, inc] 5x (20)
5-12: sc all (20-8x)
13: [2 sc, dec] 5x (15) and bind off. Stuff and sew together so seam is flat, then attach to front/bottom.

Arms (make 2):
Magic loop 3 stitches.
2: inc all (6)
3: [sc, inc] 3x (9)
4-5: sc all (9-2x)
Bind off, stuff as necessary and attach to bunny.

Tail:
I looped yarn and knotted it together to make a poofy tail.

Wednesday, February 3, 2010

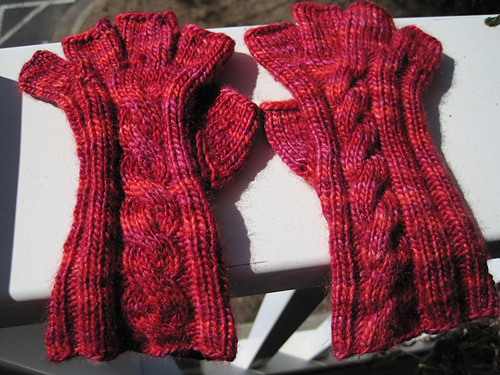
Nubbins Gloves

As mentioned in my previous posting, I've been working on fingertipless gloves. There seemingly aren't too many patterns out there for such an occasion. It should also be noted that I have unusually small hands (about 7 inches [18.5 cm] thumb-to-pinky spread, my palm being just about 3 inches [7.5cm] across). And I wanted something that would work for me to be warm, but still leave my fingers free to type as my job requires a great deal of keyboard useage, but my fingers themselves were still getting chilly. I call the tipless fingers nubbins.
Voila!


Through the use of a couple of free patterns, some general knowledge, and hopefully a bit of ingenuity, I've managed to create myself gloves that suit me, but might also suit others.


First, I want to give a great deal of credit to Mom's Cabled Mitts, whose free pattern on ravelry was the base of my gloves quite obviously. My pattern directions, however, are going to focus more on the finger portion.

Tools: 
For the body: US size 5 (3.75mm) circular needle (dpns are also fine, but I did mine on a circular)
For the fingers: US size 3 (3.25mm) dpns (for this, I'd say dpns really ARE a necessity)
Stitch markers
Stitch holder, scrap yarn
Cable needle (or you can probably use one of the dpns from the fingers, but I had a cable needle)

Yarn: 
Malabrigo Silky Merino, colorway amoroso. I used less than one skein, but I'm not sure on the yardage. (Picked up from Eat.Sleep.Knit., whose shop is linked on the sidebar.)

Skills:
knit, purl, picking up stitches, casting on stitches, cabling (which I'll explain a bit), knitting in the round

Cast on: 40 stitches in your preferred round method.

If you want to follow the instructions for the cabling section, you'll need to have stitches 17-24 on the same needle/side of the circular as one another. These 8 stitches will be knit in the first few rows. I can't emphasize enough that you should check out Mom's Cabled Mitts (for nonRavelers, I've used a direct pattern link here) if you just want to know how to make this style without the fingers. However, I did make SOME changes to the actual cabling/pattern in making mine, so I'm transcribing that here.


Okay, ready? Here's what I did!:
P1, (K3, P2 rib 3x), K8 (this is for the cabling section, if you just want ribs, then you can continue with the K3, P2 rib pattern!), (P2, K3 rib 3x), P1. Note that, if you're using a circular, after the K8 you should begin working down the opposite side.

Repeat the setup rib pattern -- P1, (K3, P2 rib 3x), K8, (P2, K3 rib 3x), P1 -- for a grand total of 5 rows.

Row 6 is the cable row. Repeat all as-before except cable the K8 section, slip the first 4 onto a cable needle, knit the next 4, then slip the skipped 4 back onto the original needle and knit 4.
Per Mom's Cabled Mitts pattern, I followed the advice to create the mirror image cables. On the right-hand glove, I put the cable needle behind my knitting; for the left-hand glove I pulled it to the front.

For the next 7 rows (rows 7-13), I continued the original rib pattern P1, (K3, P2 rib 3x), K8, (P2, K3 rib 3x), P1.
Row 14 is another cable row.
Rows 15-20 are in the original rib pattern. (Note: This is only SIX repeats of the original rib, I made the mistake and didn't notice it until later; you can feel free to make this seven, but I went with it throughout the rest of the glove)
Row 21 is another cable row.
Rows 22-28 should follow the original ribbing (we're back to seven repeats here)
29 is another cable row.

After row 29, it's time to create the thumb gusset. This term sounds more daunting than the actual process, but I did do this slightly differently than the instructions from Mom's Cabled Mitts. Note: Placement of the thumb gusset is the ONLY difference in the instructions for the left- and right-hand thumbs.


Right hand side:
Row 30, we're going to knit in pattern (except for placing two stitch markers).
Place as follows: stay in pattern up through the cable section, after the cable, knit the ribbing once (P2, K3, P2) and then place markers on either side of the middle of the next three knit stitches (K1, PM, K1, PM, K1), then continue to the end of the row.

Left hand side:
Row 30, we're going to knit in pattern (except for placing two stitch markers).
Place as follows: After you knit the ribbing once (P1, K3, P2), then place markers on either side of the middle of the next three knit stitches (K1, PM, K1, PM, K1), then continue to the end of the row.


For the next 5 rows (31-35) we're going to cast on twice in between the markers; once immediately after the first and once just before the last - there will be a lace edging to the thumb gusset as a result. All stitches between the markers should be knit. There should be 11 stitches between the two markers at the end of row 35. The rest of the stitches should continue in pattern.

On row 36, cable the cable section (Note: Again, only six repeats of the original rib instead of seven, as in row 20), and cast on one more set of increases in the thumb area, making 13 stitches between the two markers.

Rows 37 and 38, knit in pattern (with the K8 section not cabled).

At row 39, you'll slip the yarn in between the two markers onto scrap yarn or a stitch holder and cast on 1 stitch to replace the original middle knit of the K3 section in the rib. Otherwise, the knitting continues in pattern.

Rows 40-42, continue in pattern. (Note: This is again only 6 repeats, but as noted I have small hands, you may want to add another row here.)
Row 43, cable.
Rows 44-48, continue in pattern.

After row 48, you're done with the hand portion (and the references to Mom's Cabled Mitts). It should come up to just below your fingers, if it doesn't, I'd take the notes about the number of repeated rows between cable patterns into account, since there are two cables before which you could add a row (see notes, rows 36 and 43), which should get you to the length you need for your hand. Alternately, of course, you could continue the pattern for additional rows.

Also after row 48, you're going to want to slip the hand stitches onto scrap yarn or stitch holders. From this point we'll be working from the pinky inward toward the thumb (though you can feel free to work the thumbs first if you prefer!) attaching each finger to the previously knitted one by picking up stitches.

Time to make the nubbins!

Pinky:
Note: You can actually pick up your stitches wherever you like, but I find that I like to know which stitches I should be using for the pinky, etc. This is just what I found looked 'right' to me. Essentially, you're grabbing the outsides from stitches that are already there on the glove and casting on for the new interior stitches.


When looking at the right side (this'll be turned inside out as you knit it, so be careful with this instruction, you're going to want to keep knitting inside-out for this) of the right glove [on the left glove, just do the mirror image of this] you'll see (left to right) the cable section, a P2 section, and then another knit section.
Leave alone the first knit stitch of the three in the section, but pick up the next four stitches with your first dpn. Pick up the next four stitches on your second dpn. This will create the top/side/bottom of your pinky finger. On your third dpn, cast on 4 stitches.

Knit around the pinky for 9 rows (12 knit stitches) and bind off.
This is fairly loose on me, so it should suffice for people of most finger sizes.

Ring:
Working your way toward the thumb, pick up the next 6 stitches on the front on your first dpn and the next 6 stitches on the back on your second dpn. (If you have 5 dpns in this size, it'll come in handy, but if not -- I didn't -- you can reallocate these stitches as necessary after they've all been picked up.) On a third dpn, pick up about 6 stitches from the pinky. On a fourth dpn (or the end of the first or second), cast on 4 stitches. (22 stitches total.)
Knit a total of 10 rounds: on the first round, decrease twice (preferably on the pinky or bottom sides, rather than the top; 20 stitches). On the second round, decrease again, three times (17 stitches). Continue for the remaining 8 rounds knitted, then bind off.
(Note: If I had this to do again, I would only have cast on 2 stitches instead of 4 in the middle section for this finger, but, because I was done with it before I realized how large this had made the finger, I duplicated the work on the other hand. I recommend only two stitches, thus eliminating TWO of the total decreases. You'll see how this works on the middle finger.)

Middle:
Pick up the next 5 stitches along the front of the glove on your first dpn and the next 5 stitches along the back of the glove on your second dpn. Pick up 6 stitches from the ring finger on a third dpn. Cast on 2 additional stitches to either the first or second dpn. (18 total stitches)
Knit a total of 12 rounds. On the first round, decrease twice (again, preferably on the interior/bottom of the fingers) for a total of 16 stitches. For the remaining 11 rounds, knit. Then bind off.

Pointer:
Pick up the next 5 stitches from the front of the glove on your first dpn, the next 5 stitches from the back of the glove on your second dpn, and 6 from the middle finger on your third dpn. Since we're now connected on all sides, there's no need to cast on any additional stitches on this finger. As a result, there's also no need to decrease on this finger.
Knit 9 rows and bind off.


Thumb:
Now that you've done all your other fingers, the thumb should be simple. Pick up all the live stitches from your scrap yarn/stitch holder (13) and ~6 stitches from the interior of the glove.
Knit 3 rows.
Row 4: decrease 3x around thumb (going from 19 stitches to 16).
Rows 5-9, knit.
Bind off.

Now, weave in all your ends, stitch up any holes (I had a lot of stitches picked up on the interiors so as to make the holes as small as possible, or eliminate them entirely if possible, so you may not have many to close up - fingers crossed!) and block as you'd like, and they're ready to wear!

If there's anything that's leaving you lost and confused, please let me know and I'll do my best to clarify.

Thursday, January 28, 2010

Finger-tip-less knitted gloves

I've been working on learning some knitting and I've been cobbling together a few different patterns to make what I'd like.
I began with: Mom's Cabled Mitts on Ravelry and the plan is to add in Snuggles Fingerless Gloves on Ravelry with some other adjustments. I'll go ahead and post my pattern once I'm done.
For now, I leave you with

Tuesday, November 24, 2009

Christmas is coming

I made this sans-pattern and now I've got to go back and figure out what I did in order to create a second with the colors reversed.
I was in a car for 10 hours that day, and didn't crochet the whole time (some of the time it was dark out, this happens).
However, now that I've completed my novel (see previous post) for NaNoWriMo, I'm ready to dive back in. Post with pattern may or may not follow on this one:

It's over a foot (ha!) in height and is actually fillable, though probably better for a few small items, not like the giant ones they sell in stores these days.
Toe up, with an 'afterthought' heel that was done.... in the middle (without cutting or binding off the red yarn).

The colors are actually a bit darker in real life, but the flash brightens things up a lot.

Monday, November 2, 2009

Why I'm Not Crocheting too Much This Month

NaNoWriMo (you should be seeing a widget here, but they don't seem to be working right now)

Thursday, October 29, 2009

Batty

Visiting the Carlsbad Caverns, there was an adorable bat doll to commemorate the bats that live in the caves. I decided to make one instead of buying it!

Thanks to no1pugmom on ravelry for help with the cleanup on this.


Body:
R1- I began with a magic loop
R2- 6 sc in loop or 2nd chain from hook (6 sc)
R3- Inc around (12 sc)
R4- Inc around (24 sc) (I really did double again here, I wanted it to turn out fairly flat on the bottom and it did)
R5- * Sc in next 3 sc, inc * around (30 sc)
R6- * Sc in next 4 sc, inc * around (36 sc)
R7- * Sc in next 5 sc, inc * around (42 sc)
R8- * Sc in next 6 sc, inc * around (48 sc)
R9-10- 2 rounds even. (2 x 48 = 96 sc)
R11- 6sc, [yo, pull through 1x, yo into same stitch and pull through all (twice; this is two sc of the row below)]; 3 sc and repeat [ ] section, sc remainder of row (48 stitches, with bobbles each counting as 1)
R12-23- 12 rounds even (12 x 48= 576 sc) (I also took some time to make stitches in grey yarn around the feet/bobbles to accent them before moving too far in the 12 rounds here.)
R24- 10 sc, 5 sc flo, sc remainder (Attach white yarn to the 5 front loop spaces to create fangs! You don't actually HAVE to do the flo stitches, but I found it helpful in placement.)
R25-27- 3 rounds even (3 x 48= 144 sc) (I placed the eyes at this third row.)
R28- * Sc in next 6 sc, dec * around (42 sc)
R29- * Sc in next 5 sc, dec * around (36 sc)
R30- * Sc in next 4 sc, dec * around (30 sc)
R31- * Sc in next 3 sc, dec * around (24 sc)
R32- * Sc in next 3 sc, dec * around (18 sc)
R33- * Sc in next 2 sc, dec * around (12 sc)( This is when I stuffed)
R34- Dec around (6 sc)
R35- Dec around (3sc) (I wanted an extra row to give the bat a bit of a point on his head as compared to the bottom.)


Ears:
Make two.
R1- Ch 6.
R2- Sc front loop only down chain, then go back down chain sc back loop only.
R3- Ch 1, turn, and sc back to top. Finish off.
This should give your ears a bit of a curve to them, so they look more like bat ears. You can also sew them on in a curve if they don't come out already shell-shaped.


Fangs:
Note, you'll want to leave long tails of yarn on either end to help you sew the fangs onto the face. Please read all the instructions for this section before beginning! It's unorthodox I'm sure, but it does work.
Make only one.
R1- ch 6, turn
R2.0- Go through 3rd chain from hook, yarn over and pull through, go through next chain, yarn over and pull through 2 loops on hook, yarn over and pull through all, finish off
R2.1- With long tail from other end, make a slipknot. Chain 2, yarn over and pull through at first chain of the original chain, yarn over and go through the next chain, yarn over and pull through all and finish off.
At the end of this, you should have two points with yarn dangling off them, so you can now use the ends to sew the fangs on.


Wings:
It's best to read over this whole wing pattern and the note before beginning.
This pattern of decreasing the number of big stitches by one on each row is what creates a curved wing edge. Continue until wings are large enough; this was 8 rows for me (once I began that portion fo the wing). I did two rows - one toward the middle and one back down to the edge - before decreasing the number of stitches.
Make two.

R1- Ch 21, turn
R2- Sl st into 2nd chain from hook, sc through remainder, ch 3 and turn
R3- Make 5 tr into next 5 spaces (this counts as 6 tr), make 5 dbl into next 5 spaces, make 4 hdc, sc up to the last sc in row (4sc), sl st into last sc, turn.
R4- Sl st into first sc and repeat all previous row stitches until the end of the row (that is, make a sc where there was a sc before, make a dbl where there was a dbl before, etc.)
R5- Ch 3 and sl into last tr, ch 3 in the same spot, continue with 4 tr (5 incl. chain), 4 dbl, 3 hdc, 3sc, sl into next stitch, turn.
R6- Sl st into first sc of row, sc in each of the next two, make hdc in hdc, dbl in dbl, tr in tr.
R7- Ch 3 and sl into last tr, ch 3 in same spot, continue with 3 tr (4 incl. chain), 4 dbl, 3 hdc, 2 sc, sl into last stitch, turn.
R8- Sl st into first sc of row, repeat stitches from previous row (as in rows 4 and 6).
R9- Ch 3 and sl into last tr, ch 3 in same spot, continue with 3 tr (4 incl. chain), 3 dbl, 2 hdc, 1 sc, sl into last stitch, turn.
R10- Sl st into first sc of row, make sc, 2 hdc, 2 dbl, 2 tr and finish off.
Optional: On the back side of the original chain, attach a new loop and ch 3. Make 2 tr (on back side of original chain) and finish off. Leave enough yarn to sew these tabs into the main body. (This is how I did it, but it's not strictly necessary.)


Thursday, October 15, 2009

ScaWrap

This is based on a stitch from a stitch dictionary, but I figure, I made it, why not post it. I was going for something lightweight (for someone in FL) but that would be versatile - wrap, scarf, just something warm!


Monday, October 12, 2009

Braaaaaains...

This is what it looks like inside my head right now. Seriously. It's making me a bit crazy, but I'm hoping at least some of these turn out well.

Tuesday, October 6, 2009

Puppy amigurumi


I made this puppy to go along with the hat I designed in the previous post.

Obviously, if you're familiar with amigurumi, it's a pretty simple design. On the other hand, if you're not, I don't know that my pattern is the best one to start with.

That being said, here goes nothing!

Supplies:
In this case, bulky weight yarn and a 3.75mm hook for the brown.
I had stash white that is sport weight and used a 3.25mm hook on the white portion.

Notions: 
Safety eyes (these are 9 mm) and a big needle for sewing in ends/pieces. Preferably also a stitch marker.

You'll find the pattern below this lovely large photo.


Without further ado:
Head/Body:
Create a shrinking/magic ring with 5 stitches.
Expand each row by 5 (a stitch marker is probably helpful here) until you reach a total of 30 stitches.
Invisible reduce down to 10 stitches before creating and placing the muzzle and eyes.
Invisible reduce down to 5 stitches. Stuff head.
Increase next two rounds by 5 stitches each.
Repeat round at 15.
Increase by 5.
Repeat round at 20, 2x.
Increase by 5.
Invisible reduce down to small circle of 5 and stuff before finishing off.

Muzzle:
Make a circle of 5.
Increase to 10.
3 rows of 10.
Stuff and attach.

Eyes -- make two:
Chain 4.
Sl. st. in first chain.
Hdc 6x in 2nd chain.
Sl st. in last chain.
Place safety eyes through the gap created by the 6 hdcs and place just above muzzle. No need to stitch these into place because the safety eyes will hold them in place and they are not large. However, you will need to weave in the ends, so this would be a good use for them!

Note: When you place the eyes and muzzle on the face, there will be a gap between the two. You'll want to make some stitches between the two to keep the brown from showing through.

Feet -- make two (NOT ARMS):
Magic ring 5.
Repeat circle 2x.
Finish off and attach.
Note: I actually didn't stuff these. They're small and the bulky yarn holds the shape well.

Arms -- make two (NOT FEET):
Magic ring 5.
Repeat circle 5x.
Note: These were attached 'flat' rather than in the round. I actually didn't stuff these, either. They're small and the bulky yarn holds the shape well.

Ears -- make two:
Ch. 3, turn, sc 2x.
Ch., turn, sc 2x. (repeat 1x)
Repeat again, but place 2 sc in the 2nd stitch of this new row.
Ch 1, turn, and sl st. into the first stitch of the next row. Make 5 hdc in the middle stitch. Sl st into the last stitch of the row and finish off.

Tail:
Ch 9, turn.
Make 8 sc in the first 4 sc spaces (that is, make two sc in each of the first four spaces -- this gives it a curl). Sl stitch remaining 3 spaces and finish off. Weave ends back through to attach tail.


After all was said and done, I sewed a bit of brown onto the muzzle to create the nose shape.


Monday, October 5, 2009

Puppy hat!

I was commissioned (for lack of a better word) to do a puppy hat for a child's halloween costume.
Given the measurement for the head and the instruction that long was OK, I worked out this:

I'm not pleased with the length of the hat, but I was working bottom-up and I thought I'd gotten far enough. However, I'm going to add on some length.

So, for pattern: Make a basic hat, bottom up, single crochet, with invisible decreases:
Chained 42, single crochet in slip-stitch-joined rounds. However, the gauge isn't important since hats should be made to fit.
That being said, I used a bulky weight yarn (5) with a J/6mm hook and 2 inches (wide) = approx 5 stitches; 1 inch (tall) = approx 3 stitches.

The ears were the tricky part. All in US units:
Chain 6
  1. Sl st into first chain. Make 6 tr into middle stitch. Sl st into last chain.
  2. Sc around whole fan and across base chain (make 7 sc across chain). Ch 1 and turn.
  3. 7 sc. NO chain, turn.
  4. Make 6 sc across. Ch 1, turn.
  5. 6 sc across. NO chain, turn.
  6. Make 5 sc across. Ch 1, turn.
  7. Repeat line 6.
  8. Repeat line 6.
  9. Make 5 sc across. NO chain, turn.
  10. Make 4 sc across. Ch 1, turn.
  11. Repeat line 10.
  12. Repeat line 10.
  13. Make 4 sc across. Finish off.
Obviously, I still need to attach these, but I'm going to attach them based on the distance from the top of the head rather than the length (which, as I pointed out, I'm going to extend). Hopefully they'll fall properly down past the edge of the hat. :)

Lengthened and sewn together, you get: (pictures cut off here, but if you click on them you can see the full image)


Wednesday, September 30, 2009

Dalek-gurumi


I'm working on creating a dalek pattern based on my love of Doctor Who. Sure, there are patterns available, but I wanted one that suits me. I'm most of the way done with this first one and I'm seeing some definite ways I'd make adjustments.

For example: the head portion didn't come out as long and dome-y as I'd like it. Also, the lines seem a bit... diagonal. (Did I mention I'm a bit of a perfectionist?)

However, I am continuing anyway.

Any thoughts for how to correct the diagonal?

Friday, September 18, 2009

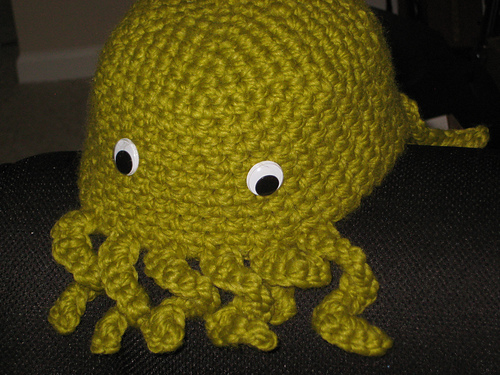
Cthulhuhat


Magic ring start - 6 sc. Use stitch marker for end of each round.

Add 6 sc per round up to 42 sc (7 rounds).

Maintain at 42 sc until hat fits over head and ends approx. midway over forehead (12 rounds in this pattern, crocheting fairly loosely - I am finding on a second time around that a tighter stitch makes 11 an alright count for a smaller head).

New round: 17 sc; chain 8 (I chained 7 for the smaller 'girlie' version in order to give the wearer a better opportunity to see); 3sc in each chain back to base (21sc); sc in next 2 spaces. Repeat 5 times (6 times total, 6 tentacles). Sc to end of round.

Sc in each of 42 stitches for next two rounds.

Finish hat, weave in ends. Add stitch-on googly eyes.

Wings (make 2; turn at end of each line): Ch 3
2 sc, ch 1
2 sc, ch 3
2 sc in ch, 2 hdc in sc, ch 1
2 sc, ch 4
3 sc in ch, 2 hdc in sc, ch 1
3 sc, ch 5
4 sc in ch, 3 hdc in sc.
From this point do not finish, instead, ch 2 and make 7 sc across the top (flat side) of the current wing.

Use thinner (scrap) yarn to stitch wings onto back. I covered the edge where I joined the hat and wove ends in.

Please, please, please! Feel free to message me if there’s anything that is unclear/hard to follow here.
Also: International crocheters - I’m in the US using US verbiage (sc/hdc).


And now, introducing:

Smaller, "girlie" version of the hat.