Showing posts with label destash. Show all posts

Thursday, April 1, 2010

Happy Easter

The Easter season is upon us, and I've been working on creating an amigurumi bunny to go with the basket I crocheted.


Pattern below, along with plenty of process photos.

And now, for the ears! (n.b. the nose is with the same yarn that I used for the basket, as are the ear bits.)


Need:
Yarn (I used sport weight I Love This Yarn! from Hobby Lobby)
Contrast yarn (for nose/ears; I used Crystal Palace Yarns Party in "spring picnic")
Safety eyes
Stitch marker(s) as preferred
Tapestry needle
Crochet hook - F/3.75mm -- I crochet very loosely. Feel free to adjust as necessary


Head/Body:
Magic loop: 4 stitches (or other preferred method). (4)
2: Increase every stitch (make 2 sc in each sc space) (8)
3: Make [1 sc, inc in next stitch] 4x (12)
4: Make [2 sc, inc in next stitch] 4x (16) 
5: [3 sc, inc in next stitch] 4x (20)
6: [4 sc, inc] 4x (24)
7: [5 sc, inc] 4x (28)
8: [6 sc, inc] 4x (32)
9-13: sc every stitch (32-5x)
14: 20 sc, then work cheeks on remaining 12 stitches: 2sc, inc 2x, 4sc, inc 2x, 2sc (36)
15-17: 20 sc, then: dec, sc, inc 2x, sc, dec 2x, sc, inc 2x, sc, dec (36-3x)
18: [6 sc, dec] 4x (32)
19: [2 sc, dec] 8x (24)
20: [3sc, dec] 4x (20)
21: sc around (20) (I stuffed the head, added eyes, and sewed the nose on here)
22: [4 sc, inc] 4x (24)
23: [5sc, inc] 4x (28)
24: [6sc, inc] 4x (32)
25-26: sc around (32-2x)
27: [7sc, inc] 4x (36)
28-30: sc around (36-3x)
31: [8 sc, inc] 4x (40)
32-33: sc around (40-2x)
34: [9 sc, inc] 4x (44)
35-38: sc around (44-4x)
39: [9 sc, dec] 4x (40)
40: [3 sc, dec] 8x (32)
41: [2 sc, dec] 8x (24)
42: [4 sc, dec] 4x (20) (I stuffed more here.)
43: [2sc, dec] 5x (15)
44: [sc, dec] 5x (10)
45: dec all (5)
46: dec, decrease 3 to 1 (2) and bind off.

Ears (make 2):
Chain 7, slip stitch closed.
2-12: sc around (7-11x)
13: sc, dec, sc, dec, sc (5)
14: sc around (5)
15: sc, dec 2x (3)
16: sc around (3) and bind off. (Add stitches for interior of ear. I did this by picking a spot near the top and threading the contrast color through, then doing this twice more through the same top loop but different bottom loops.)

Feet (make 2):
Magic loop 5 stitches.
2: inc all (10)
3: [sc, inc] 5x (15)
4: [2 sc, inc] 5x (20)
5-12: sc all (20-8x)
13: [2 sc, dec] 5x (15) and bind off. Stuff and sew together so seam is flat, then attach to front/bottom.

Arms (make 2):
Magic loop 3 stitches.
2: inc all (6)
3: [sc, inc] 3x (9)
4-5: sc all (9-2x)
Bind off, stuff as necessary and attach to bunny.

Tail:
I looped yarn and knotted it together to make a poofy tail.

Tuesday, October 6, 2009

Puppy amigurumi


I made this puppy to go along with the hat I designed in the previous post.

Obviously, if you're familiar with amigurumi, it's a pretty simple design. On the other hand, if you're not, I don't know that my pattern is the best one to start with.

That being said, here goes nothing!

Supplies:
In this case, bulky weight yarn and a 3.75mm hook for the brown.
I had stash white that is sport weight and used a 3.25mm hook on the white portion.

Notions: 
Safety eyes (these are 9 mm) and a big needle for sewing in ends/pieces. Preferably also a stitch marker.

You'll find the pattern below this lovely large photo.


Without further ado:
Head/Body:
Create a shrinking/magic ring with 5 stitches.
Expand each row by 5 (a stitch marker is probably helpful here) until you reach a total of 30 stitches.
Invisible reduce down to 10 stitches before creating and placing the muzzle and eyes.
Invisible reduce down to 5 stitches. Stuff head.
Increase next two rounds by 5 stitches each.
Repeat round at 15.
Increase by 5.
Repeat round at 20, 2x.
Increase by 5.
Invisible reduce down to small circle of 5 and stuff before finishing off.

Muzzle:
Make a circle of 5.
Increase to 10.
3 rows of 10.
Stuff and attach.

Eyes -- make two:
Chain 4.
Sl. st. in first chain.
Hdc 6x in 2nd chain.
Sl st. in last chain.
Place safety eyes through the gap created by the 6 hdcs and place just above muzzle. No need to stitch these into place because the safety eyes will hold them in place and they are not large. However, you will need to weave in the ends, so this would be a good use for them!

Note: When you place the eyes and muzzle on the face, there will be a gap between the two. You'll want to make some stitches between the two to keep the brown from showing through.

Feet -- make two (NOT ARMS):
Magic ring 5.
Repeat circle 2x.
Finish off and attach.
Note: I actually didn't stuff these. They're small and the bulky yarn holds the shape well.

Arms -- make two (NOT FEET):
Magic ring 5.
Repeat circle 5x.
Note: These were attached 'flat' rather than in the round. I actually didn't stuff these, either. They're small and the bulky yarn holds the shape well.

Ears -- make two:
Ch. 3, turn, sc 2x.
Ch., turn, sc 2x. (repeat 1x)
Repeat again, but place 2 sc in the 2nd stitch of this new row.
Ch 1, turn, and sl st. into the first stitch of the next row. Make 5 hdc in the middle stitch. Sl st into the last stitch of the row and finish off.

Tail:
Ch 9, turn.
Make 8 sc in the first 4 sc spaces (that is, make two sc in each of the first four spaces -- this gives it a curl). Sl stitch remaining 3 spaces and finish off. Weave ends back through to attach tail.


After all was said and done, I sewed a bit of brown onto the muzzle to create the nose shape.


Friday, September 18, 2009

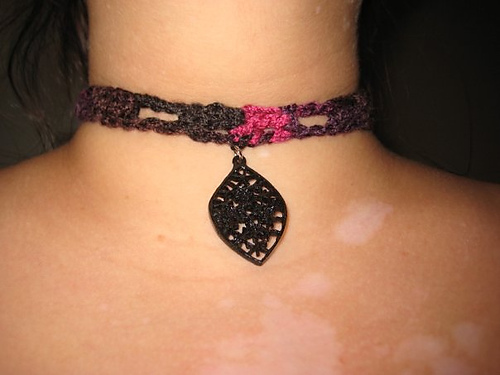
Quick choker


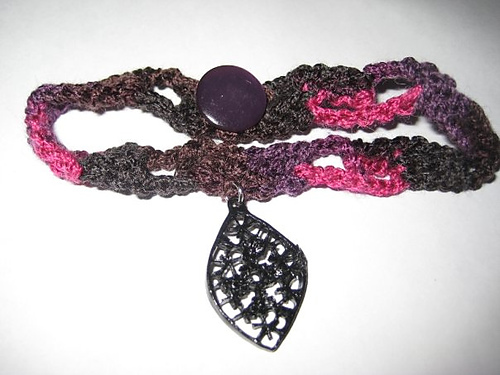
I improvised this pattern based on my own neck size, total length is a (stretchy) 12.5 inches. I used a stash button and pendant. It’s a base of a triple (U.S. term) crochet stitch, so all you have to know is triple and chain.

Ch. 6, turn.
Tr into chains 5 and 6.
* Ch 5, turn.
Tr into top of chain from row below.
Ch 4, turn.
2 tr.
Ch 4, turn.

2 tr. **
Repeat * to ** 5x.
Ch 5, turn.
Tr into top of chain from row below and finish.

Weave in ends. Attach button to beginning triple crochets; use end loop as button hole.

NOTE: Using the pattern this way,

the button would be slightly off-center in back if attached pendant is centered between two solid triple crochet sections.

Suggestion: If you use a fancy button, this could be the front rather than the back of the choker.