Monday, June 7, 2010

Cupcakes

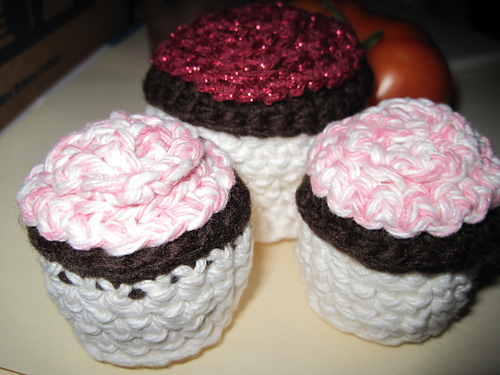
I've done a bit of playing around with yarn and found a "recipe" I like for cupcakes.


The mini cupcakes are quite small:
and their pattern is in 3 parts:
Because they're so small, you'll only use a small amount of yarn for each. I can't even guess at the amounts! I used an F hook but crochet a bit loosely.
The frosting and "cup" are in worsted weight/kitchen cotton, the brown is in a bulky weight, but shouldn't matter.

Frosting:
Ch 35, sc all, bind off, but leave a long tail for sewing later.
(Update: I realized, I forgot to explain that the frosting is sewn as a coil onto the top of the cupcake. The coils should barely overlap and the frosting will come up a bit off the top of the cupcake. I start on the outside and coil inward.)

Cupcake:
This is a solid item:
--Magic loop. Sc 5 stitches.
Increase by 5 each row:
--2 sc in each stitch around (10)
--sc, 2 sc in next stitch -- 5x (15)
--sc, sc, 2 sc in next stitch -- 5x (20)
Bind off.

'Paper'/Wrapper:
In order to make the cupcake have an edge that sticks out over the "paper", sc into the inside loop only on the bottom of the cupcake top.
--sc around all (20)
-- decrease by 2 (crochet 2 tog, twice, I did this at stitches 1 and 10) -- (18)
-- sc all around (18)
-- sl st all around (on the interior, to create the round for the bottom) -- (18)
-- sc all around interior (18)
-- dec (crochet 2 tog) around -- (9)
fill
-- dec around and sew shut. (continue decreasing as necessary to get a small enough opening to sew shut if this is not small enough.)


Larger cupcakes -- they are more or less the same, just on a larger scale! On the other hand, the red yarn I used for the frosting is an unknown stash yarn, I'd guess it to be DK weight.

Frosting:
Ch 60, sc all, bind off, but leave a long tail for sewing later.
The frosting is sewn as a coil onto the top of the cupcake. The coils should barely overlap and the frosting will come up a bit off the top of the cupcake. I start on the outside and coil inward.

Cupcake:
This is a solid item:
--Magic loop. Sc 5 stitches.
Increase by 5 each row:
--2 sc in each stitch around (10)
--sc, 2 sc in next stitch -- 5x (15)
--sc, sc, 2 sc in next stitch -- 5x (20)
--sc, sc, sc, 2 sc in next stitch -- 5x (25)
--sc, sc, sc, sc, 2 sc in next stitch -- 5x (30)
Bind off.

'Paper'/Wrapper:
In order to make the cupcake have an edge that sticks out over the "paper", sc into the inside loop only on the bottom of the cupcake top.
--sc around all (30)
-- decrease by 2 (crochet 2 tog, twice, I did this at stitches 1 and 15) -- (28)
-- sc all around (28)
-- decrease by 2 (crochet 2 tog, twice, I did this at stitches 1 and 14) -- (26)
-- sc all around (26)
-- decrease by 2 (crochet 2 tog, twice, I did this at stitches 1 and 13) -- (24)
-- sl st all around (on the interior, to create the round for the bottom) -- (24)
-- sc all around interior (24)
-- sc, crochet 2 tog around -- (16)
-- dec by half (crochet 2 tog, around) -- (8)
fill

-- dec around and sew shut. (continue decreasing as necessary to get a small enough opening to sew shut if this is not small enough.)


Thursday, April 1, 2010

Happy Easter

The Easter season is upon us, and I've been working on creating an amigurumi bunny to go with the basket I crocheted.


Pattern below, along with plenty of process photos.

And now, for the ears! (n.b. the nose is with the same yarn that I used for the basket, as are the ear bits.)


Need:
Yarn (I used sport weight I Love This Yarn! from Hobby Lobby)
Contrast yarn (for nose/ears; I used Crystal Palace Yarns Party in "spring picnic")
Safety eyes
Stitch marker(s) as preferred
Tapestry needle
Crochet hook - F/3.75mm -- I crochet very loosely. Feel free to adjust as necessary


Head/Body:
Magic loop: 4 stitches (or other preferred method). (4)
2: Increase every stitch (make 2 sc in each sc space) (8)
3: Make [1 sc, inc in next stitch] 4x (12)
4: Make [2 sc, inc in next stitch] 4x (16) 
5: [3 sc, inc in next stitch] 4x (20)
6: [4 sc, inc] 4x (24)
7: [5 sc, inc] 4x (28)
8: [6 sc, inc] 4x (32)
9-13: sc every stitch (32-5x)
14: 20 sc, then work cheeks on remaining 12 stitches: 2sc, inc 2x, 4sc, inc 2x, 2sc (36)
15-17: 20 sc, then: dec, sc, inc 2x, sc, dec 2x, sc, inc 2x, sc, dec (36-3x)
18: [6 sc, dec] 4x (32)
19: [2 sc, dec] 8x (24)
20: [3sc, dec] 4x (20)
21: sc around (20) (I stuffed the head, added eyes, and sewed the nose on here)
22: [4 sc, inc] 4x (24)
23: [5sc, inc] 4x (28)
24: [6sc, inc] 4x (32)
25-26: sc around (32-2x)
27: [7sc, inc] 4x (36)
28-30: sc around (36-3x)
31: [8 sc, inc] 4x (40)
32-33: sc around (40-2x)
34: [9 sc, inc] 4x (44)
35-38: sc around (44-4x)
39: [9 sc, dec] 4x (40)
40: [3 sc, dec] 8x (32)
41: [2 sc, dec] 8x (24)
42: [4 sc, dec] 4x (20) (I stuffed more here.)
43: [2sc, dec] 5x (15)
44: [sc, dec] 5x (10)
45: dec all (5)
46: dec, decrease 3 to 1 (2) and bind off.

Ears (make 2):
Chain 7, slip stitch closed.
2-12: sc around (7-11x)
13: sc, dec, sc, dec, sc (5)
14: sc around (5)
15: sc, dec 2x (3)
16: sc around (3) and bind off. (Add stitches for interior of ear. I did this by picking a spot near the top and threading the contrast color through, then doing this twice more through the same top loop but different bottom loops.)

Feet (make 2):
Magic loop 5 stitches.
2: inc all (10)
3: [sc, inc] 5x (15)
4: [2 sc, inc] 5x (20)
5-12: sc all (20-8x)
13: [2 sc, dec] 5x (15) and bind off. Stuff and sew together so seam is flat, then attach to front/bottom.

Arms (make 2):
Magic loop 3 stitches.
2: inc all (6)
3: [sc, inc] 3x (9)
4-5: sc all (9-2x)
Bind off, stuff as necessary and attach to bunny.

Tail:
I looped yarn and knotted it together to make a poofy tail.

Wednesday, February 3, 2010

Nubbins Gloves

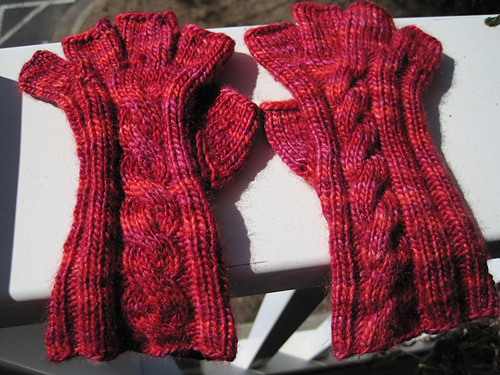
As mentioned in my previous posting, I've been working on fingertipless gloves. There seemingly aren't too many patterns out there for such an occasion. It should also be noted that I have unusually small hands (about 7 inches [18.5 cm] thumb-to-pinky spread, my palm being just about 3 inches [7.5cm] across). And I wanted something that would work for me to be warm, but still leave my fingers free to type as my job requires a great deal of keyboard useage, but my fingers themselves were still getting chilly. I call the tipless fingers nubbins.
Voila!


Through the use of a couple of free patterns, some general knowledge, and hopefully a bit of ingenuity, I've managed to create myself gloves that suit me, but might also suit others.


First, I want to give a great deal of credit to Mom's Cabled Mitts, whose free pattern on ravelry was the base of my gloves quite obviously. My pattern directions, however, are going to focus more on the finger portion.

Tools: 
For the body: US size 5 (3.75mm) circular needle (dpns are also fine, but I did mine on a circular)
For the fingers: US size 3 (3.25mm) dpns (for this, I'd say dpns really ARE a necessity)
Stitch markers
Stitch holder, scrap yarn
Cable needle (or you can probably use one of the dpns from the fingers, but I had a cable needle)

Yarn: 
Malabrigo Silky Merino, colorway amoroso. I used less than one skein, but I'm not sure on the yardage. (Picked up from Eat.Sleep.Knit., whose shop is linked on the sidebar.)

Skills:
knit, purl, picking up stitches, casting on stitches, cabling (which I'll explain a bit), knitting in the round

Cast on: 40 stitches in your preferred round method.

If you want to follow the instructions for the cabling section, you'll need to have stitches 17-24 on the same needle/side of the circular as one another. These 8 stitches will be knit in the first few rows. I can't emphasize enough that you should check out Mom's Cabled Mitts (for nonRavelers, I've used a direct pattern link here) if you just want to know how to make this style without the fingers. However, I did make SOME changes to the actual cabling/pattern in making mine, so I'm transcribing that here.


Okay, ready? Here's what I did!:
P1, (K3, P2 rib 3x), K8 (this is for the cabling section, if you just want ribs, then you can continue with the K3, P2 rib pattern!), (P2, K3 rib 3x), P1. Note that, if you're using a circular, after the K8 you should begin working down the opposite side.

Repeat the setup rib pattern -- P1, (K3, P2 rib 3x), K8, (P2, K3 rib 3x), P1 -- for a grand total of 5 rows.

Row 6 is the cable row. Repeat all as-before except cable the K8 section, slip the first 4 onto a cable needle, knit the next 4, then slip the skipped 4 back onto the original needle and knit 4.
Per Mom's Cabled Mitts pattern, I followed the advice to create the mirror image cables. On the right-hand glove, I put the cable needle behind my knitting; for the left-hand glove I pulled it to the front.

For the next 7 rows (rows 7-13), I continued the original rib pattern P1, (K3, P2 rib 3x), K8, (P2, K3 rib 3x), P1.
Row 14 is another cable row.
Rows 15-20 are in the original rib pattern. (Note: This is only SIX repeats of the original rib, I made the mistake and didn't notice it until later; you can feel free to make this seven, but I went with it throughout the rest of the glove)
Row 21 is another cable row.
Rows 22-28 should follow the original ribbing (we're back to seven repeats here)
29 is another cable row.

After row 29, it's time to create the thumb gusset. This term sounds more daunting than the actual process, but I did do this slightly differently than the instructions from Mom's Cabled Mitts. Note: Placement of the thumb gusset is the ONLY difference in the instructions for the left- and right-hand thumbs.


Right hand side:
Row 30, we're going to knit in pattern (except for placing two stitch markers).
Place as follows: stay in pattern up through the cable section, after the cable, knit the ribbing once (P2, K3, P2) and then place markers on either side of the middle of the next three knit stitches (K1, PM, K1, PM, K1), then continue to the end of the row.

Left hand side:
Row 30, we're going to knit in pattern (except for placing two stitch markers).
Place as follows: After you knit the ribbing once (P1, K3, P2), then place markers on either side of the middle of the next three knit stitches (K1, PM, K1, PM, K1), then continue to the end of the row.


For the next 5 rows (31-35) we're going to cast on twice in between the markers; once immediately after the first and once just before the last - there will be a lace edging to the thumb gusset as a result. All stitches between the markers should be knit. There should be 11 stitches between the two markers at the end of row 35. The rest of the stitches should continue in pattern.

On row 36, cable the cable section (Note: Again, only six repeats of the original rib instead of seven, as in row 20), and cast on one more set of increases in the thumb area, making 13 stitches between the two markers.

Rows 37 and 38, knit in pattern (with the K8 section not cabled).

At row 39, you'll slip the yarn in between the two markers onto scrap yarn or a stitch holder and cast on 1 stitch to replace the original middle knit of the K3 section in the rib. Otherwise, the knitting continues in pattern.

Rows 40-42, continue in pattern. (Note: This is again only 6 repeats, but as noted I have small hands, you may want to add another row here.)
Row 43, cable.
Rows 44-48, continue in pattern.

After row 48, you're done with the hand portion (and the references to Mom's Cabled Mitts). It should come up to just below your fingers, if it doesn't, I'd take the notes about the number of repeated rows between cable patterns into account, since there are two cables before which you could add a row (see notes, rows 36 and 43), which should get you to the length you need for your hand. Alternately, of course, you could continue the pattern for additional rows.

Also after row 48, you're going to want to slip the hand stitches onto scrap yarn or stitch holders. From this point we'll be working from the pinky inward toward the thumb (though you can feel free to work the thumbs first if you prefer!) attaching each finger to the previously knitted one by picking up stitches.

Time to make the nubbins!

Pinky:
Note: You can actually pick up your stitches wherever you like, but I find that I like to know which stitches I should be using for the pinky, etc. This is just what I found looked 'right' to me. Essentially, you're grabbing the outsides from stitches that are already there on the glove and casting on for the new interior stitches.


When looking at the right side (this'll be turned inside out as you knit it, so be careful with this instruction, you're going to want to keep knitting inside-out for this) of the right glove [on the left glove, just do the mirror image of this] you'll see (left to right) the cable section, a P2 section, and then another knit section.
Leave alone the first knit stitch of the three in the section, but pick up the next four stitches with your first dpn. Pick up the next four stitches on your second dpn. This will create the top/side/bottom of your pinky finger. On your third dpn, cast on 4 stitches.

Knit around the pinky for 9 rows (12 knit stitches) and bind off.
This is fairly loose on me, so it should suffice for people of most finger sizes.

Ring:
Working your way toward the thumb, pick up the next 6 stitches on the front on your first dpn and the next 6 stitches on the back on your second dpn. (If you have 5 dpns in this size, it'll come in handy, but if not -- I didn't -- you can reallocate these stitches as necessary after they've all been picked up.) On a third dpn, pick up about 6 stitches from the pinky. On a fourth dpn (or the end of the first or second), cast on 4 stitches. (22 stitches total.)
Knit a total of 10 rounds: on the first round, decrease twice (preferably on the pinky or bottom sides, rather than the top; 20 stitches). On the second round, decrease again, three times (17 stitches). Continue for the remaining 8 rounds knitted, then bind off.
(Note: If I had this to do again, I would only have cast on 2 stitches instead of 4 in the middle section for this finger, but, because I was done with it before I realized how large this had made the finger, I duplicated the work on the other hand. I recommend only two stitches, thus eliminating TWO of the total decreases. You'll see how this works on the middle finger.)

Middle:
Pick up the next 5 stitches along the front of the glove on your first dpn and the next 5 stitches along the back of the glove on your second dpn. Pick up 6 stitches from the ring finger on a third dpn. Cast on 2 additional stitches to either the first or second dpn. (18 total stitches)
Knit a total of 12 rounds. On the first round, decrease twice (again, preferably on the interior/bottom of the fingers) for a total of 16 stitches. For the remaining 11 rounds, knit. Then bind off.

Pointer:
Pick up the next 5 stitches from the front of the glove on your first dpn, the next 5 stitches from the back of the glove on your second dpn, and 6 from the middle finger on your third dpn. Since we're now connected on all sides, there's no need to cast on any additional stitches on this finger. As a result, there's also no need to decrease on this finger.
Knit 9 rows and bind off.


Thumb:
Now that you've done all your other fingers, the thumb should be simple. Pick up all the live stitches from your scrap yarn/stitch holder (13) and ~6 stitches from the interior of the glove.
Knit 3 rows.
Row 4: decrease 3x around thumb (going from 19 stitches to 16).
Rows 5-9, knit.
Bind off.

Now, weave in all your ends, stitch up any holes (I had a lot of stitches picked up on the interiors so as to make the holes as small as possible, or eliminate them entirely if possible, so you may not have many to close up - fingers crossed!) and block as you'd like, and they're ready to wear!

If there's anything that's leaving you lost and confused, please let me know and I'll do my best to clarify.
Thursday, January 28, 2010

Finger-tip-less knitted gloves

I've been working on learning some knitting and I've been cobbling together a few different patterns to make what I'd like.
I began with: Mom's Cabled Mitts on Ravelry and the plan is to add in Snuggles Fingerless Gloves on Ravelry with some other adjustments. I'll go ahead and post my pattern once I'm done.
For now, I leave you with

Tuesday, November 24, 2009

Christmas is coming

I made this sans-pattern and now I've got to go back and figure out what I did in order to create a second with the colors reversed.
I was in a car for 10 hours that day, and didn't crochet the whole time (some of the time it was dark out, this happens).
However, now that I've completed my novel (see previous post) for NaNoWriMo, I'm ready to dive back in. Post with pattern may or may not follow on this one:

It's over a foot (ha!) in height and is actually fillable, though probably better for a few small items, not like the giant ones they sell in stores these days.
Toe up, with an 'afterthought' heel that was done.... in the middle (without cutting or binding off the red yarn).

The colors are actually a bit darker in real life, but the flash brightens things up a lot.

Monday, November 2, 2009

Why I'm Not Crocheting too Much This Month

NaNoWriMo (you should be seeing a widget here, but they don't seem to be working right now)

Thursday, October 29, 2009

Batty

Visiting the Carlsbad Caverns, there was an adorable bat doll to commemorate the bats that live in the caves. I decided to make one instead of buying it!

Thanks to no1pugmom on ravelry for help with the cleanup on this.


Body:
R1- I began with a magic loop
R2- 6 sc in loop or 2nd chain from hook (6 sc)
R3- Inc around (12 sc)
R4- Inc around (24 sc) (I really did double again here, I wanted it to turn out fairly flat on the bottom and it did)
R5- * Sc in next 3 sc, inc * around (30 sc)
R6- * Sc in next 4 sc, inc * around (36 sc)
R7- * Sc in next 5 sc, inc * around (42 sc)
R8- * Sc in next 6 sc, inc * around (48 sc)
R9-10- 2 rounds even. (2 x 48 = 96 sc)
R11- 6sc, [yo, pull through 1x, yo into same stitch and pull through all (twice; this is two sc of the row below)]; 3 sc and repeat [ ] section, sc remainder of row (48 stitches, with bobbles each counting as 1)
R12-23- 12 rounds even (12 x 48= 576 sc) (I also took some time to make stitches in grey yarn around the feet/bobbles to accent them before moving too far in the 12 rounds here.)
R24- 10 sc, 5 sc flo, sc remainder (Attach white yarn to the 5 front loop spaces to create fangs! You don't actually HAVE to do the flo stitches, but I found it helpful in placement.)
R25-27- 3 rounds even (3 x 48= 144 sc) (I placed the eyes at this third row.)
R28- * Sc in next 6 sc, dec * around (42 sc)
R29- * Sc in next 5 sc, dec * around (36 sc)
R30- * Sc in next 4 sc, dec * around (30 sc)
R31- * Sc in next 3 sc, dec * around (24 sc)
R32- * Sc in next 3 sc, dec * around (18 sc)
R33- * Sc in next 2 sc, dec * around (12 sc)( This is when I stuffed)
R34- Dec around (6 sc)
R35- Dec around (3sc) (I wanted an extra row to give the bat a bit of a point on his head as compared to the bottom.)


Ears:
Make two.
R1- Ch 6.
R2- Sc front loop only down chain, then go back down chain sc back loop only.
R3- Ch 1, turn, and sc back to top. Finish off.
This should give your ears a bit of a curve to them, so they look more like bat ears. You can also sew them on in a curve if they don't come out already shell-shaped.


Fangs:
Note, you'll want to leave long tails of yarn on either end to help you sew the fangs onto the face. Please read all the instructions for this section before beginning! It's unorthodox I'm sure, but it does work.
Make only one.
R1- ch 6, turn
R2.0- Go through 3rd chain from hook, yarn over and pull through, go through next chain, yarn over and pull through 2 loops on hook, yarn over and pull through all, finish off
R2.1- With long tail from other end, make a slipknot. Chain 2, yarn over and pull through at first chain of the original chain, yarn over and go through the next chain, yarn over and pull through all and finish off.
At the end of this, you should have two points with yarn dangling off them, so you can now use the ends to sew the fangs on.


Wings:
It's best to read over this whole wing pattern and the note before beginning.
This pattern of decreasing the number of big stitches by one on each row is what creates a curved wing edge. Continue until wings are large enough; this was 8 rows for me (once I began that portion fo the wing). I did two rows - one toward the middle and one back down to the edge - before decreasing the number of stitches.
Make two.

R1- Ch 21, turn
R2- Sl st into 2nd chain from hook, sc through remainder, ch 3 and turn
R3- Make 5 tr into next 5 spaces (this counts as 6 tr), make 5 dbl into next 5 spaces, make 4 hdc, sc up to the last sc in row (4sc), sl st into last sc, turn.
R4- Sl st into first sc and repeat all previous row stitches until the end of the row (that is, make a sc where there was a sc before, make a dbl where there was a dbl before, etc.)
R5- Ch 3 and sl into last tr, ch 3 in the same spot, continue with 4 tr (5 incl. chain), 4 dbl, 3 hdc, 3sc, sl into next stitch, turn.
R6- Sl st into first sc of row, sc in each of the next two, make hdc in hdc, dbl in dbl, tr in tr.
R7- Ch 3 and sl into last tr, ch 3 in same spot, continue with 3 tr (4 incl. chain), 4 dbl, 3 hdc, 2 sc, sl into last stitch, turn.
R8- Sl st into first sc of row, repeat stitches from previous row (as in rows 4 and 6).
R9- Ch 3 and sl into last tr, ch 3 in same spot, continue with 3 tr (4 incl. chain), 3 dbl, 2 hdc, 1 sc, sl into last stitch, turn.
R10- Sl st into first sc of row, make sc, 2 hdc, 2 dbl, 2 tr and finish off.
Optional: On the back side of the original chain, attach a new loop and ch 3. Make 2 tr (on back side of original chain) and finish off. Leave enough yarn to sew these tabs into the main body. (This is how I did it, but it's not strictly necessary.)